

Get Group Member Data + LinkedIn URLs + Private Emails
Overview0. Requirements
|
|

0. Requirements
|
|


1. Extract Group Members with GrouplyUse Grouply (https://grouply.io) to get member data from Facebook groups. With the FULL plan you’ll unlimited groups and unlimited members. Grouply will give you the following: – First name – Last name – Company name (for those profiles that has this data) – Work position (for those profiles that has this data) – Profile URL – Group URL Extract the a CSV file. |
|

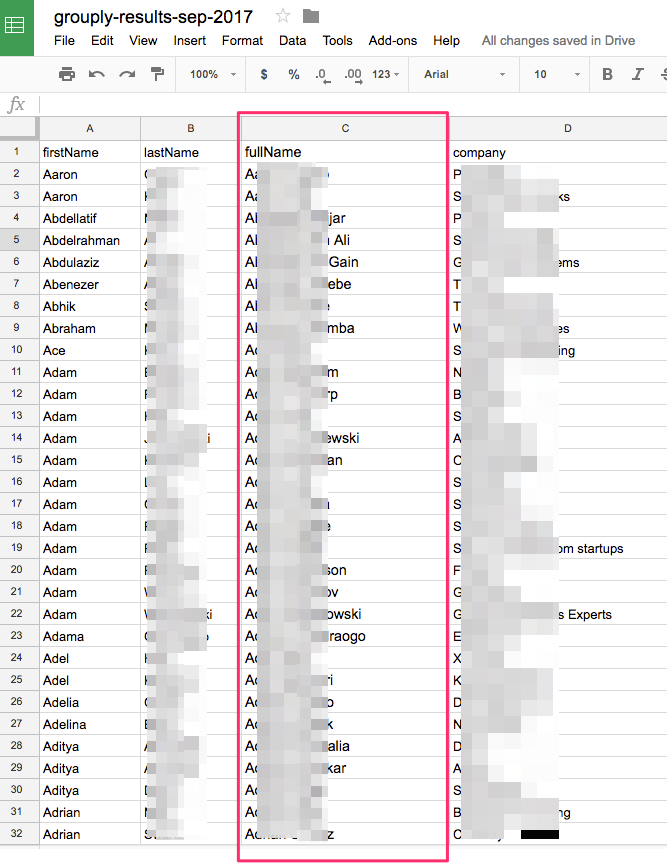
2. Prepare the Grouply results file for PhantombusterIn order to prepare for the LinkedIn URL scraping with Phantombuster we are going to clean up the data a bit. Open up the Grouply results file in Google Sheets. Then select firstName, lastName, and company columns. |
|

2.1 Concatenate Full NameWe now need the Full Name and Company from the file. (Grouply has First Name and Last Name in two Columns so you need to concatenate them into one column, using this syntax: =CONCATENATE(A2,” “, B2) So just copy the string above and paste it into where you want the FULL NAME. |
|
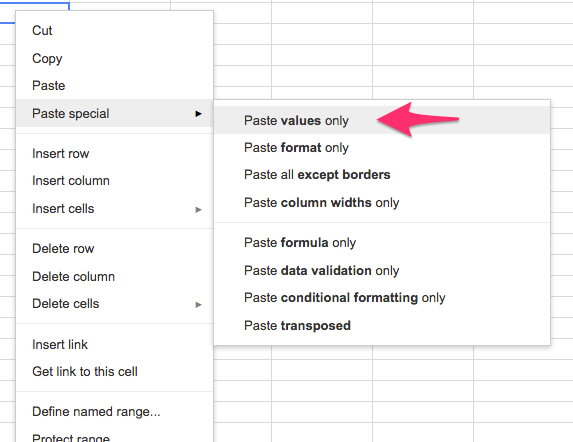
2.2 Copy Into a New SheetNow we have the full name and company name and are ready to find the LinkedIn Profiles. Copy the full name and company name into a new Google Sheet that we will use in the next step. When you paste select paste special and choose “Paste values only”. |
|
|
Then you will get something like this. Make sure the columns are named “Name” and “Company”. This is important for the next step. |
|

3. Use Phantombuster to Get LinkedIn URLsGo to https://phantombuster.com/ and sign up for a FREE account. 3.1 Set up a new AgentAfter that, set up a new Agent and give it a name that describes the action that will be done – in this case “LinkedIn Profile URL Finder”. Make sure Template is set to “NickJS”. |
|

3.2 Copy the script into the AgentNext step is to open the LinkedIn URL finder script document and copy everything in this document. Then paste the contents under script in the new Agent. |
|


3.3 Setup the right Google Sheet sourceNow we will update the string that points to your Google sheet. To get this URL just press share with “Anyone with the link can view” and then press “Copy link”. Paste this link in the script where it says: const spreadsheetUrl = “YOUR_GOOGLE_SHEET_URL_HERE” It should like the second image to the right. And after pasting remove the “/edit?usp=sharing” from the end of the string. After that is done you can save the script. |
1) 2) |


3.4 Updating settingsDuring the process Phantombuster scrapes Google and after a while the IP will get blocked, so set the number of retries to 10 to keep the script running. You might need to come back and check the progress once in awhile. Remember to press “Save” in the bottom of the page. |
|


3.5 Launch the scraper!Phantombuster will just fill the first empty column in the sheet with results. When the agent is finished you will find your result file under “Files”, select “Output”, refresh the feed and click “Download”. This will give you a CSV file that you can upload in Google Sheets to easy filter out the results. If you get an error message like “Wrong column name for person / company name.” make sure there is no special characters or alone numbers in the fields. |
|

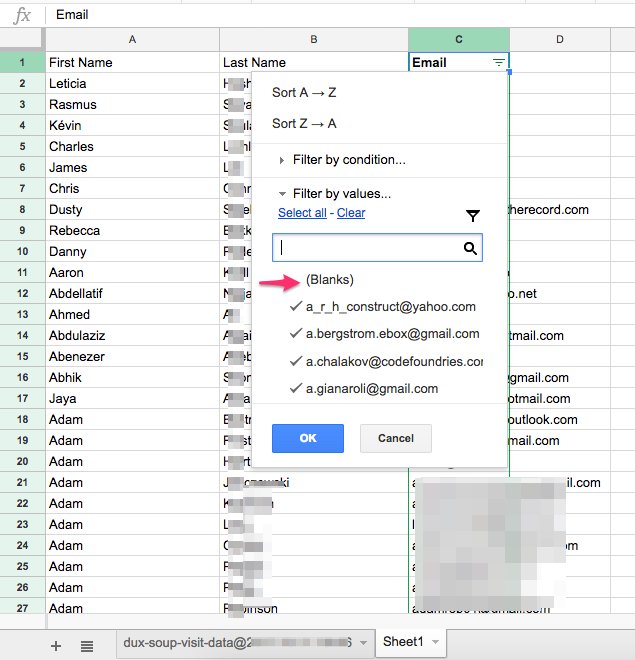
4. Prepare the data for Dux-SoupNow when we have scraped all the LinkedIn URLs we are going to sort the results using the “filter” function in Google sheets. We only want the rows that include “linkedin.com/in” (profile URLs), in case we got other results from the scraping, it happens occasionally. What is neat is that we got around 90% hit rate between complete Grouply data and LinkedIn Profile URLs. You also need to have a separate Column for First Name and Last Name. In order to get a full name into two columns you need to select the column and select: Data -> “Split text to columns…” -> Separator “Space” |
|

4.1 Dux- Soup Revisit TemplateNow make a copy of the DuxSoupRevisitTemplate and save it on your Google Drive / Computer. Then copy all the Profile URLs, First Name, and Last Name into this spreadsheet. Next step is to save this file as a .CSV-file, that Dux-Soup uses. Go to “File” -> “Download as” -> “Comma-separated values (.csv)”. |
|

4.2 Visit the dux-storeAfter you have purchased Dux-Soup Pro you shall head to the dux-store to enable the 1-1 private email exchange. Either you exchange your current LinkedIn connections, or you buy point for cash. If you have a lot of connections I would recommend you to trade in the connections you have – your points will be saved to your account and you can use them later. |
|

4.3 Converting connections to Dux pointsFor every connection you have you will get 1 point that can be used to get private emails. If you don’t have that many connections on LinkedIn – check out this guide on how to add thousands of contacts quickly. |
|

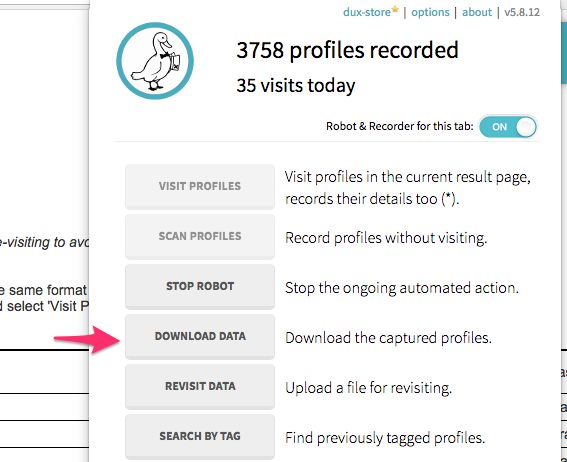
4.4 Open the revisit CSV in Dux-SoupNext step is to sign into LinkedIn and after that you click the Dux-Soup icon in the toolbar and select “Revisit Data”. After you have uploaded the list and it looks like the image to the right. Then select ‘Visit Profiles‘ from the Dux-Soup menu. Now the magic begins, this will take a while and it is important that you have a Premium LinkedIn account (will be able to visit 500 profiles a day), otherwise you will be logged out. |
|

4.5 “Re-visiting”When you start the visiting robot you will get the question if you want to spend your points in order to look for email addresses from contacts in the list you just uploaded. Then just press OK. |
|

4.6 Fetching Emails!Now the robot will visit the profiles one by one and store information about each profile, including their private email, if it is possible to find. Sometimes it happens that the robot stops then just need to start it again. Also make sure that your computer doesn’t fall asleep. If you are using a Mac you can use a little tool called Caffeine that prevents the computer to fall asleep. |
|

4.7 Downloading Emails!Open up the Dux-Soup extension by clicking the icon in the browser bar. Then click “Download Data”. After that, select “Visit Data”. You will now download a .CSV-file full with details about the members, including emails for the connections you found. |
|

5. Create a Facebook Custom AudienceNow it’s time to create the long awaited Custom Audiences! Upload the dux-visit-data file to Google Sheets to clean up the data. Select the First Name, Last Name, and Email columns from the original sheet and paste them into a new sheet. After you have a sheet with there columns, select “File” -> “Download as” -> “Comma-separated values”. |
|
5.1 Uploading to Facebook Ad ManagerNow you select Customer File, even though your data is not from customers, this is the option we have to work with. |
|

5.2 Finalizing the Custom AudienceFinal step. Either you create an ad right away for this audience, or you can create a lookalike audience that is based on the interests of the members you just uploaded. Now we are done! |
|

