

Pulling it all together
Step 1. Define a pain point for an industry sector
Step 2. Get list of industry sector business emails
Step 3. Make it Personal – minimum 6 personalisations in the email. Create dynamic visuals using available online business image assets.
Step 4. Subject linesmassively impact open rates – interest over salesly works best.
Step 5. Pick your moment – time of day and day of week can triple your open rate.
Step 6. Drip campaigns for each funnel stage – Not opened, not clicked, not trialed, not purchased.
Step 7. Facebook Remarketing – Create 1-2-1 personalised Ads, using business name & dynamic images, using FB catalogue dynamic product ads.
Step 8. Squeeze Pages – Singularly focused, clear CTA, remove clutter.
Step 9. Pricing Strategy – Annual discounts, 3 pillar pricing strategy.
Step 10. Onboarding Journey – Create urgency.
Step 11. Trial Strategy – Shorter trials…
Step 12. Trial Re-engagement – Extending Trial.
Step 13. Nurture Back – Track and never forget, consistency and tenacity is the key.
Now read again and get started, but if you do have questions, please post below, or reach out to us for more specific support.
1. Identify And Dissect A Pain Point
We all know that pain points are essentially problems your target audience has, and that your service or product offers a solution for. The success of your email strategy depends on you identifying and dissecting pain points for each sector and industry you are targeting. By way of example, if your target audience is within the hospitality sector, and more specifically food and accommodation, your industries would be hotels, motels, inns, resorts, guest houses, restaurants, pubs, and maybe bars. You could either identify unique pain points for each of those industries, or see how your product or service offers a solution needed across all industries, but for different reasons.
But as Startup Yard reminds us:
Pain points can be tricky to identify, because they don’t always reflect exactly what the startup thinks of itself as doing. […] A company that is working on compression may see themselves as “providing compression software.” But the customer may not be looking for compression software. The problem isn’t “I need compression software,” but rather, “I need to send files faster,” or “I need a better storage system.”
You are selling solutions, not benefits, products, or a service. It is easier to identify how your product or service provides a solution if you have identified pain points specific to different industries. You can take it a step further by also identifying how the primary pain point influences secondary pain points, and if your solution extends to these.
It is a form of segmentation, but instead of segmenting according to personal demographics, you are segmenting according to industry.
The Lean Startup Methodology teaches principles of “getting out of the building” to test hypotheses and talking to real potential customers, to identify and validate pain points. Now of course while there is no substitute for “shoe leathering it” and actually talking to customers face to face, proper old school, but you can of course do much of this work with desktop research.
| Whatever your prefered route, this is a crucial step, your initial segmentation and emails will focus around this pain point. If you skip or don’t validate your assumptions, then your top of the funnel conversion metrics will be pants, and will screw with your ultimate ROI. |
2. Gather Business Emails For Each Industry
If you’re trying to achieve hockey stick growth for your MRR, sending emails to your current customers or people who have given you their email address is simply not enough. You are looking to reach new customers, business who need your product or service, but probably don’t even know you exist.
One of the easiest ways of doing this is by acquiring a curated list of business emails, which groups business email addresses according to industry. That way you don’t end up with a bunch of email addresses for businesses that would never have any interest in your product and service. Only businesses from the industries or sectors you are targeting.
There are a bunch of great sources to get this sort of segmented business data, like scraping Google Places, Yelp, Web.com, Facebook, FourSquare, Yext, SuperPages, Yellow Pages, Local.com etc, but to get this data and in a usable format will take a serious amount of scraping, proxies and time. The alternative is to buy a list, there are of course many data brokerage services available to shortcut the time and effort of scraping. The best route really depends on how much data you want and whether time or money is your limiter.
Data Enrichment
Once you have a source for your business listing data, we now need to enrich it with further business related content, that we can use to hyper personalise our communications and sale funnel.
Clearbit can return upto 58 company data attributes, such as location, logo, description, social account details etc. The Clearbit Enrichment service allows you to upload your CSV data list and download the full enriched data ready for your email campaign.
A great alternative to Clearbit, if you already have some social account information in your data list is Phantombuster, that allows you to pull data from social accounts such as LinkedIn, Twitter, Instagram and Facebook. These social accounts are a treasure trove of useful business data, opening times, location, company logo’s and much more that can be used in your hyper personalisation emails and visuals.
The above examples of data enrichment involve manual processes of downloading and uploading of CSV’s, not taxing work, but if you want to scale this process it can all be automated. Both Clearbit and Phantombuster have APIs which can be very simply used together to auto enrich you data, if you don’t have programming skills, a freelancer on somewhere like Upwork.com would be able to do this in a day or two.
3. Create Personalised Emails and Visuals
OK, so you’ve got your sector list with a validated pain point, now it’s time to get really personal… By that I mean make your emails personal and by personal I mean a minimum of 6 personalizations in your initial cold email.
| In this day and age of GDPR in Europe and broader Cambridge Analytica personal data stealing, when we talk about personalisation, we mean business data. The days of individual cold-emailing are behind us, we’ve found much better ways, without getting locked-up, or just appearing creepy! |
Unlike individuals who rightly crave privacy of their personal data, businesses are screaming out to be found and publish tonnes of usable public data, that can be used to create hyper-personal emails to the business.
SPOILER ALERT: Of course at the end of every business email is an individual and when you reach them, as we’ll discover in Step 7, remarketing can be used to then target the individual, without falling foul of any data privacy regulations 😉
personalization requires a little more effort than a standard approach to email marketing, but the benefits make it all worthwhile:
- By improving personalization in email messages we improved click-through rates by an average of 14 percent and conversions by 10 percent.
- Emails with a personalized subject line are 26 percent more likely to be opened.
If you were the owner or manager of Olsten Staffing Services, which of the two images below is likely to invoke a more favorable response?
Promotion and stationery companies have been using this trick for years, sending one pen, already engraved or printed up to a business, totally cold. Imagine the cost of producing and customizing the pen, and then mailing it out!! Yet this continues to be good marketing practice and not just for pens, but all manor of business products; because delivering a highly personalized product offering yields crazy conversions.
Intercom, the second fastest growing SaaS company on the planet, is using this exact hyper personalization strategy to market new features and upgrades to its own customer base, using boilerplate videos and dropping in customers’ website screenshots and extending that out to the email.
Intercom did a great job here, not only did they drop in a personalized image, they animated it in a gif, to really draw your attention to it…
The video they link to from the email then continues the now familiar visual of the website (check out from 9 secs in). If you have a website url in your data list, you can use services such as Miniature to generate website screenshot images, which are great for personalisation, especially if your product/service is an add-on for the prospect’s website. As with all the services we’ve used or recommended in this guide Miniature have an API, so this can all be automated 🙂 .
Marketing Land reports that using personalized videos or images results in up to 8x improvement in click-through rates:
- Influitive (disclosure: client) personalized an event invite email and saw an 8x improvement in click-through rates versus standard outbound email campaigns.
- Reltio (disclosure: client) put their recipients’ names on a mug and increased open rates by 10x compared to the company average.
- The University of Waterloo (disclosure: client) used personalized video to connect with prospective students, 70 percent of whom opened the school’s email – a 1,000-percent boost over typical recruitment outreach.
Using Dynamic Tags and Images
Most all good email service providers support the inclusion of dynamic images. So many to mention, but HubSpot, PersistIQ, MailShake, MailChimp are a few that we’ve used to provide this and all the tracking and drip sequencing you’ll need.
- Create dynamic personalized images for each business on your list using NiftyImages or Lemlist.
- Upload your email data list to your preferred mail provider, including the unique image URL for each record.
- Use the email editor, insert an image in the email body, then view the source and change the image URL to the merge tag for the image URL.
If you have access to a designer, NiftyImages has a really cool option, where you can upload a PSD file, and be able to update text and images within the layers of the PSD and output an image dynamically via URL parameters or an API! This means you can have your designer make a really cool designed template of your product visual, drop in a few boilerplates for a business name, logo, location, etc, and update these on the fly with real data, for each prospect that opens your email.
In this Nifty example, they create an image from a PSD template that has 6 separate variables.
NiftyImages have some fantastic guides on how their Photoshop Image creation service works here: Niftyimages.com/Photoshop and helpful deep dive guide into updating images via url parameters here: blog.niftyimages.com/2018/03/30/advanced-url-customization-using-photoshop-images/.
If you can’t create PSD files, then Lemlist has a great browser-based editor option, to create dynamic images, as well as cool feature to process your list against Clearbit, to get further personalization data to use in your images.
What’s key for this strategy is to figure out what image you are going to create, that best highlights your product or service offering, and to source elements such as company logos, etc. online.
The example image below, of a mobile loyalty card service offer, has 8 specific to the business bits of data or imagery, so any business owner/manager viewing this in an email will instantly recognize it as customized to their business:
You might be looking at the above image and thinking, wow yeah looks great, but that looks like a tonne of work, which doesn’t scale very well for mass emailing. Well WRONG, would you be amazed if I told you the above image is created on the fly, in sub-one-second, when the recipient opens the email??
In the example image below that we emailed out to promote a loyalty chatbot service, we used a GIF to really catch the prospects eye. There are 8 personalizations in the 7 frames of the GIF below, can you spot them all…?
The key to achieving this sort of result is all in the preparation, as well as some simple API development. All the above business data and more can be found online, using business websites, directories, and social listings/pages. Collecting the data you need upfront and utilizing the APIs of services such as NiftyImages or Lemlist means you can create on the fly awesome-looking customized visuals.
| With GrowthList, we provide business metadata, links to images, and all you need to create awesome email images. All you will need is a simple API script to pull it all together and automate. |
For ready-made scrapers and APIs to pull business data from social platforms and websites check out Phantombuster, they’re an API store, with loads of ready-made cloud APIs to help boost your marketing data and growth lists. Alternatively use Upwork.com to find a freelancer to create the script, it should take no more than a couple of days. Give us a shout if you need any help with this!
Email Body Text
In the body text of the email, avoid using terms like “your business” and use a dynamic tags instead to insert the actual business name.
personalisation helps establish an emotional connection, and the more personalised your outreach email is, the stronger the connection.
We experimented with lots of email body text, but honestly once you have a hyper-personalised product image in your email, the body text doesn’t have as much impact.
In the end, each time we reduced the text, the click rate improved a percent or two, so we ended up with:
Hey [business name]
I was looking at your business and I think I have an idea that could help you double your [something specific to your product/service offering and the pain point you identified for industry sector], this idea helped other [business sector] double their [industry specific revenue metric, ie orders, traffic, sales, bookings etc..].
I would love to share how this idea works, I already did most of the work, see your exclusive example below.
[business custom image]
CALL TO ACTION BUTTON TO SQUEEZE PAGE
Kind Regards
Our benchmark for success for the first email is a 30% click rate, which for a totally cold email, we think is pretty fantastic.
4. Email Subjects
So now hopefully you’re starting to see the mechanics of this strategy, and how powerful it can be with just a little bit of upfront research and some hyper-personalisation.
We’ve covered the click through rate once your email gets opened, but it’s worth paying extra attention to the email subject line, because this has a big impact on your email open rate.
Like with the email body, personalisation is key to improving open rates, below are some of the best subject line strategies we’ve used:
- [Business Name], Thanks!
- [Business Name], Here’s something different to consider
- Smart ways to leverage [pain point] for [Business Name]
- Are you the right person to talk to at [Business Name]?
- You’re a hero to [Business Sector]
- Feedback for [Business Name]
- Opportunity for [Business Name]
- [Business Name] Info Request
- Hey [Business Name] am I too late?
- [Business Name] sorry for the delay…
We recommend you experiment with what works best for your sector and also to mix and match them. Appending “RE: “ to the start of your email subject can be considered a bit spammy and can sometimes cause offence, but does tend to improve open rates.
When A/B testing open rates, always do this in conjunction with the email click rate, its the best combination of the two that really counts! There’s no point having a great open rate if no-one clicks, or vise-versa…
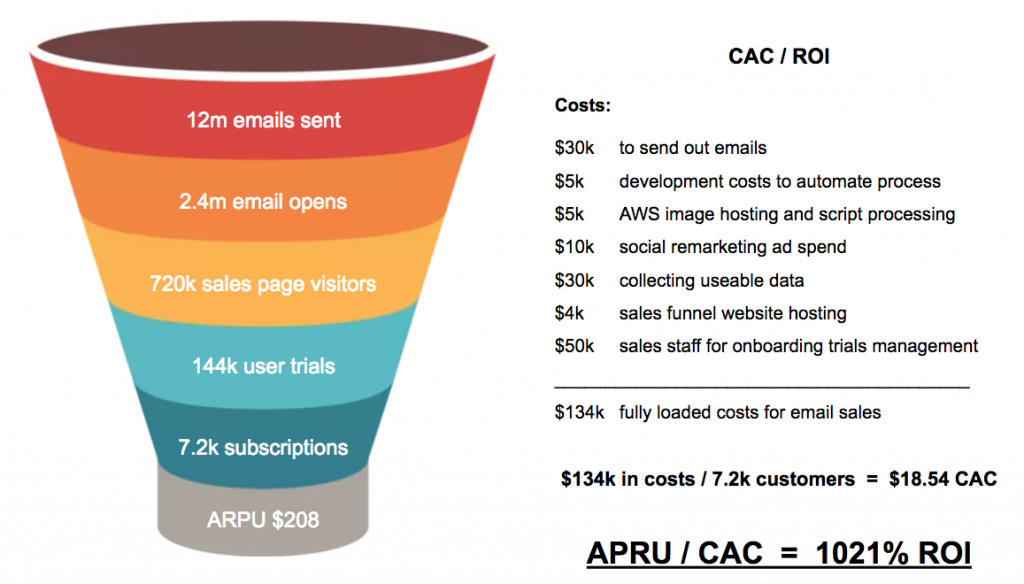
| Industry average open rates differ depending on who you’re talking to, but it’s not unusual for 4% to be the number banded around. From our experience of sending over 12 million emails, we expect to get 15% open rate per campaign, when personalising the subject line as well. We’ll cover drip campaigns in Step 6, but at the risk of another Spoiler Alert, you can expect to get this to around the 65% mark. |
5. Day of Week and Time of Day
Subject lines aren’t the only thing that can impact your email open rates. When the email hits the recipients inbox also has a big impact. In the early days of this strategy we sent 1 millions emails to find the optimum day and time to achieve the best open rates.
However this too will vary from one industry to the next, so you should pay attention to your campaign stats to identify the optimal time, being aware of time zones too if your audience is spread around the globe.
Below is a table of our open rate results from a mixed selection of industry sectors, from 1 million emails:
* send times based on local time of recipient
In summary, we find it best to send Monday afternoon or Thursday afternoon, second best was Tuesday morning, or Wednesday afternoon. Again your industry sector might vary to this, but these are a good “starter for 10”…
6. Make Your Drip Campaign More Effective
Drip campaigns should be used for each stage of your onboarding funnel, to help move your prospect onto the next step. We found 4 to 5 emails per stage is optimum for best conversion results.
Create powerful content for each email
The content needs to be really good, not too long, and it should benefit the recipient in some way: if they don’t perceive a benefit, they will mark your email as spam. If you’ve done a good enough job in identifying pain points for each industry, then your content needs to focus on highlighting that, and how your product or service eliminates or softens that pain point.
Keep the content fairly simple, strip it down to one pain point and one CTA – which would also be the only link. As with landing pages, including too much information, and too many links, can confuse and overwhelm your prospects. Each email should be linked to a single action or step that you want the prospect to take. And if writing isn’t a strength for you, hire a professional copywriter to take care of the content. The extra cost will be worth it, with professional copywriters fully aware of best practices for subject lines, powerful sentences, brevity, and bold CTAs.
Set a schedule
How often are you going to send out new emails in your drip campaign? Every day, twice a week, once a week? There is no firm rule here, though a practice we’ve followed is to start off with every other day, then slowing down, doubling the number of days between each email. You should experiment with different schedules, which will allow you to identify what schedule works best for your audience.
Measure the outcome
The top priority here is analytics and tracking, all good email solutions have them; The ultimate goal is MRR growth, so measuring how much traffic your sign up page originated from your drip campaign, and how much of that ended up converting. However, you should also be looking at the open rate for each email in the campaign, and clicks from them. This helps in identifying problems with the campaign that may require adjustment. If people aren’t opening your email, it could be that your subject line is a bit weak. If people are opening, but not clicking through on your CTA, is it because the CTA is wrong (or not easily seen), or because the copy and pain point fell flat?
It is quite common to have multiple drip campaigns running at once, segmented not only according to industry, but eventually also according to action taken. If someone signs up for a free trial, they would then be switched to your onboarding drip campaign, which would not only help them get the full benefit of your product during the trial period, but also nudge them towards becoming a paid customer by the time the trial ends.
Similarly, someone who clicks on a link/CTA but doesn’t take any further action might be switched to a campaign that focuses on getting them to take action, very different to the rest of your campaign that is still trying to get other recipients to take any action, including actually selecting a CTA.
Sales Funnel Drip Campaigns
6.1 Awareness
Your initial cold emails should be focused on building up the awareness of your product or service, as generally these prospects won’t have heard about your business before. The only goal of this initial drip campaign is to get the prospect to click the call-to-action (CTA) in the email and get them to your sales page (and into the Interest segment of your sales funnel).
We detailed in Step 3 the template used for the initial email, we found using this as a base and altering between less text or adding in more benefits, over a further 5 emails works best on average. The one consistent for this series of emails was the dynamic image, which was always included.
It’s important to track prospect behaviour to look for signals of when to go beyond 5 or 6 emails, or stop before that number. For example if after 3 or 4 emails, sent on different days and times, all emails are unopened, it’s probably time to call it quits. However if the emails have been opened several times, it might be more about timing and worth pushing to 6 or 7 emails.
As a broad rule of thumb, we doubled the time between each email sent, so not bombarding them.
6.2 Interest
Once a prospect has opened and clicked the CTA in one of your initial emails, your Awareness drip campaign should cease and move them into the Interest funnel segment.
| An important aspect of your CTA link within all your emails is to include a unique identifier of the prospect, so the action they take on your sales page can be logged against your growth list, as well as used for remarketing. |
We found a useful signal of intent, was to track scroll depth of the prospect on the sales page. For example a prospect who scrolls all the way to the bottom of your sales page, but doesn’t click a CTA button, you can email asking if they have unanswered questions about your product or service. Equally users who only got half-way down your sales page, you can include content they won’t have seen from the latter half of your page in follow-up emails.
Also by passing through the prospects unique identifier from email to sales page means this can be logged against tracking pixels, to enable personalised remarketing, see Step 7 of this guide for further details on how to set this up for remarketing on steroids.
Sales pages are covered in detail in Step 8 of this guide, but there single purpose should be to move the prospect from the Interest to Decision stage of your funnel. Ideally this should be a free trial of your product or service.
6.3 Decision
This is the point where we’re moving the prospect from an anonymous cold business email into an individual, who you will target as a person, rather than a business. Behind your sales page CTA you’re going to be capturing all the details you need to do this, as part of the trial onboarding process.
You should have already segmented your email lists according to different industries, but capturing the job title of the prospect you will be emailing really helps You can then segment further drip emails according to this. For example a CEO will likely respond to different language, solutions, and CTAs than a sales manager, or a department head.
| Knowing what your successful users do during onboarding is key to being able to nurture your prospects to take the same actions. |
Now you have the prospect within a trial, the drip campaign should focus on them realising the value of your offering. If your solution is platform based, using something like Intercom.com where you can trigger emails when a user has or hasn’t completed specific event are super effective.
6.4 Action
Once your prospect has taken action and purchased or subscribed to your offering, now isn’t the time to stop emailing them. Instead focus should now switch to success management, intertwined with upgrade and upsell opportunities.
Having a good grasp of what triggers your existing successful customers to perform these actions are a good starting point for these emails. For example if you have a website solution, once their new website has received 100 visitors, offering a newsletter optin plugin might be a good upsell.
7. Set Up A Remarketing Campaign On Facebook
Advertising on Facebook can be a little hit-and-miss; some business see a great ROI, while others struggle with a high CPC and low CTR, and the primary reason for this is poor targeting. Facebook offers a great number of targeting features, but for SaaS brands, the standard targeting options aren’t enough. If you target an audience based solely on gender, age, and location demographics, you end up targeting a large number of people who probably have no interest in your product or service. And even narrowing it down by targeting a lookalike audience is no guarantee of success.
You should instead only target a custom audience based on Facebook users who have:
- Visited your website, landing on any page, or only those who visit specific pages.
- Followed a link that took them to one of your landing pages.
- Signed up for your newsletter/periodic emails.
- Signed up for a free trial of your product or service.
- Signed up as a paying customer.
- Installed your mobile app.
- Previously engaged with your business on Facebook, either liking your page, reacting to or commenting on a post, or following a link to your website from an Ad or post on Facebook.
This is, in essence, remarketing, and what it does is highlight your brand, product, or service to people who have already shown some interest. Some are qualified leads, others are warm leads, and a few might already be customers. You’re nurturing the one group, while gently trying to nudge the other two groups further along your conversion funnel.
But in order to create custom audiences, you need to collect and sort data first. Which Facebook makes a little easier for you.
7.1 Select how you want to create your custom audience
Facebook allows you to create custom audiences from five different data sets:
- Customer Files, using information you already have on your customers, or imported directly from MailChimp. You can also create lookalike audiences based on your customers information, including lifetime value (LTV).
- Website Traffic, using a Facebook pixel to gather info on people who took certain actions on your website, from viewing content, through to form submissions and registrations.
- App Activity, based on users who install, launch, and/or take certain actions in your mobile app.
- Offline Activity, using a list of people whose info you collected through in-store activity, phone calls, or any other offline activity.
- Engagement, using a list created through people engaging with your Page or content on Facebook or Instagram.
You can benefit from using any of these data sets, but for the purpose of this strategy we will only be focusing on custom audiences based on visitors to your sales page from the email.
7.2 Create a Facebook pixel
In order to create a custom audience from website traffic, you need to add a Facebook pixel to each page you want to track.
- You can do this by navigating to your Ads dashboard in Facebook, selecting Ads Manager or Facebook Ads in the top left, followed by All Tools and Pixels (under the Measure & Report section).
- Select Create a Pixel, and then name your pixel before proceeding to the next screen.
- The Facebook pixel is a bit of code that needs to be added to each page you want to track, and this can either be done manually, through Google Tag Manager, or through a 3rd-party integration. Facebook includes instructions of exactly where in each page’s code you need to past the pixel code.
- The Facebook pixel allows you track specific events, with nine basic events:
- View content – For tracking whenever someone lands on a specific page on your website. Best when used only on certain pages, such as landing pages, blog pages, or your pricing page.
- Search – For when someone uses the search function to look for something on your site, most commonly products on an e-commerce site.
- Add to cart – For e-commerce sites, and quite self explanatory.
- Add to wishlist – Also e-commerce, and only applicable if you offer a wishlist facility.
- Initiate checkout – For when someone starts the checkout process, and useful for remarketing to users who abandon their cart.
- Add payment info – For when someone enters their payment information during the checkout process. Not to be confused with registration.
- Make purchase – Specifically for customers who actually complete a purchase on your website.
- Lead – For when someone signs up for a trial, newsletter, or any other process you have set up for users to identify themselves as a lead on your site.
- Complete registration – For when a visitor completes a registration form on your site, such as for a subscription product.
- The base code of the Facebook pixel is always the same, but your selected event gives additional code to add to relevant pages. You can have multiple events throughout your site.
- If you have installed the pixel correctly, the status in Facebook should change to “verified”, but you can also use the Facebook Pixel Helperextension in Chrome to check that everything is correct. This extension also acts as a troubleshooting guide.
Once you have the Facebook pixel correctly set up, you can start working at creating a remarketing campaign on Facebook that targets specific users based on their actions on your site, and elsewhere. Doing this switches your Facebook marketing from being loosely targeted to being hyper targeted towards people who have expressed some interest in your brand, product, or service. You aren’t targeting users anymore, you are remarketing to people who have already been exposed to what you offer, with the intent being to move them further along your conversion funnel.
The common thread so far in the preceding steps of this strategy has been hyper personalisation through business meta data with dynamic images, and remarketing is no different. A unique ID that we set for each business in our growth list, is used to link to the dynamic images, and can also be logged in the Facebook pixel, allowing the creation of dynamic facebook Ads showing hyper relevant one-to-one ads.
| Email to sales page visitors will see dynamic images, with their logo and business details in place, on Facebook and Instagram. Using the same dynamic image, as they will have seen in the email and the sales page, helps improve familiarity and recognition, driving high converting, low cost remarketing campaigns. |
7.3 Creating a Product Catalog
In order to create dynamic Ads one-to-one matched to each member of the custom audience from the sales site visitors, you need to upload a product catalogue to Facebook.
You can do this by navigating to your Ads dashboard in Facebook, selecting Ads Manager or Facebook Ads in the top left, followed by Catalogues under Assets (and create an E-commerce type catalogue).
To link a specific Facebook or Instagram user to a business you are targeting, we add a unique ID, linking back to the business, which we log against the user when they hit the sale page, which contains the facebook pixel.
As we have hyper personalised images of the product or services we’re offering, we can upload each image as a distinct product with title and description specific to the business we’re targeting.
Facebook provide an nice API, so you can add these new products to your catalog, or you can upload a CSV file, we started with the latter and ended up automating to the former.
The unique ID used for the business becomes the facebook product ID and facebook does all the matching magic from here.
Rather than go into the details of uploading your product catalogue here, Facebook provide a really good guide here: https://www.facebook.com/business/help/125074381480892 so I’ll skip that part, but do go and read this.
7.4 Dynamic Ads
To create a Dynamic Ad, based on the the product catalogue you have uploaded, select “Catalogue Sales” as the marketing objective, within the standard Create Ad process, in the Ads Manager.
When creating the ad, you can select both the pixel audience created and the product catalog uploaded. Once both of these are selected, you can select other parameter data from your uploaded product file, to use as dynamic text in the Ad title or description.
For the purpose of this strategy, we want to target prospects who have viewed your sales page, but not yet purchased, this is all tracked by the Pixel, so we just need to choose how long we want to target them for. In our experience 14 days is sufficient amount of time to nurture those on the fence, over to a sale, but aligning this time to your trial period seems like a sensible approach. That’s not to say you cease remarketing after this point, more that your focus and intent of the Ad should change after this period, from nurturing a sale, to more boarder re-engagement.
Obviously Facebook also owns a bunch of other properties and has distribution for Ad inventory beyond Facebook.com, selecting ‘Automatic Placement’ ensures that you can target your custom audiences more effectively, whilst still being hyper targeting and personal.
As you can see from the screen grab below, as well as the main Ad image, the Ad headline, Description, and web deep link can all be dynamic, using any of the data you included in your product catalogue. Passing through your unique business ID, which is used as the product ID in the catalogue and Facebook refer to as ‘Reseller ID’, as shown below, back from the Ad, to the sales site will ensure that you can maintain full tracking and effectiveness of your remarketing campaigns.
7.5 Other methods for further nurturing with remarketing to consider
- Landing page visitors – Facebook Ads that target users who have reached one of your landing pages should always be tailored according to the landing page, and whether or not the user took any action on the landing page.
- Previous visitors to your website – these Ads would primarily serve to increase brand awareness and recognition, encouraging non-converting visitors to return to your site – and possibly convert – while nurturing existing customers, and keeping your brand top of mind.
- Free trial users – start by first delivering helpful topics to new trial users. These should be articles or pages that help trial users get the maximum benefit from your product or service. Gradually switch to reminding users that their trial is about to expire, offering an extended trial, or even a discount for users who convert to paying customers before their trial ends. The aim is to nudge them towards taking the next step.
- People who have accessed gated content – if you offer access to eBooks, white papers, or webinars in exchange for users providing you with more detailed information on themselves, you know that these customers are a little more interested in your product or service than other site visitors. Remarket to them accordingly, using free trial offers or discounts to encourage them to take the next step.
- People who have installed your mobile app – if you have a mobile app, you can remarket to users who have installed your app, launched it, or taken certain steps within the app. What can be very effective here is to target users soon after they install with info that adds to your onboarding experience.
- People who have engaged with your brand on Facebook – it is possible that a lot of users who have engaged with your brand on Facebook, either by reacting to a post or ad, following a link in a post, or leaving a comment, are not actual customers. Use remarketing to nudge them into your funnel, or move them further along. By engaging with you, they have indicated that they have an interest in your brand, product, or service.
Facebook also supports custom events, making it possible for you to refine what you track:
- think only tracking visitors when they navigate to a second page, not just viewing one page,
- or differentiating between users who have signed up for your basic plan versus those with a more advanced plan.
This is considerably more difficult than using the standard events, but – as noted – it allows you to refine your audience further, which can be extremely valuable when it comes to targeting them on Facebook. You will probably need a developer to help with this, but don’t let that scare you off.
There are many more ways to remarket to users on Facebook, but as with any marketing efforts, it is up to you to identify what works best for your brand and product. Pay attention to the metrics on each remarketing effort to see what delivers the best return. With the Facebook pixel installed on your site you are able to better track conversions, micro-conversions, and other visitor behaviour, leading to better use of Facebook Ads since you are targeting users who are already familiar with your brand, and therefore more likely to convert.
8. Reconfigure Your Squeeze And Sales Pages
The second step in our email strategy saw you gathering business emails through a service like GrowthList. But to be clear, these are all cold leads and the idea to is to then turn these into warm or hot leads, and you do this by sending them a series of emails, as we covered in Step 6. We start with a single email that highlights a pain point common to their industry, with some detail of how your SaaS product offers the ideal solution. The goal of this email is to get them to follow the CTA and either request more information – which would be your Interest funnel drip campaign – or to actually sign up for a free trial (Decision funnel), or full access. Which means the CTA should link to a unique landing page that is also a squeeze page.
But, you ask, isn’t a landing page already a squeeze page?
Not necessarily.
Landing pages are always linked to some marketing effort, from paid adverts on SERPs, to email marketing, and social media advertising. And sometimes a landing page is designed merely as an entry to the rest of the website, with the CTA linking to a specific page or area of the website. Squeeze pages are designed to convert cold leads into warm and hot leads – as noted earlier, this happens when the visitor gives you their personal details in exchange for a trial of your SaaS, an eBook, webinar access, or some other valuable information from you that is not available elsewhere on your website.
As illustrated in the example above, the one consistent aspect we’ve found super important and impactful, is to pull through the same dynamic image used in your initial cold email. This will help orientate and make the prospect instantly feel at ease when landing on your squeeze page, seeing something not only familiar that triggered the visit, but also hyper personal to them.
There are plenty of tools available that make it easy to create powerful squeeze pages, such as Leadpages or Instapage. But there are a few points to remember when creating a landing or squeeze page:
- Attention grabbing – your squeeze page must have a strong headline that ideally tells the visitor exactly what they will learn – or how they will benefit – by giving you their email address.
- Uncluttered – aim for as little copy as possible, but ensure it gives all the information that is necessary, while emphasising benefits and value. Structure the copy so it is easily digestible or scannable. Try to only use one image, but make sure it enhances rather than detracts. You can include social proof in the form of a testimonial from one of your current customers, or the logos of brands using your product, but again this shouldn’t detract from the primary goal – getting visitors to give you their email address.
- A strong offer – what do visitors get in return for giving up their email address? If it is something they can already get on your website they’ll be reluctant to sign up. It has to be unique and be valuable to them: a standard newsletter that anyone can sign up for isn’t unique, but one that includes exclusive tips, video’s, and other limited access content is much more appealing. Don’t be afraid to make the offer more enticing by limiting access only to the first X subscribers, or only to visitors who sign up before a certain date.
- Additional info – while the best landing and squeeze pages are uncluttered, including a small footer with relevant business info like your privacy policy, physical address, and other contact information won’t hurt.
- Don’t ask for too much – ask only for the information you need, nothing more. Usually this is a name and email address, but could include business name, industry, and job title. Avoid asking for other contact information such as a phone number. Dan Zarrella analysed more than 40,000 landing pages and found that any increase in the number of form fields led to a decrease in conversions. His optimal number of form fields? Three.
We have previously mentioned that segmenting your email list according to industry and sector will help you create more targeted email messages that address pain points specific to each industry or sector. What is equally important is that each of those email messages should link to a different squeeze page that is again optimised for that industry or sector. The wording should be different, and the offer itself could be different. There is no limit to the number of landing and squeeze pages you can have in operation at any one time. In fact, the more you have, the more leads you are likely to generate, with businesses that have more than 40 landing pages generating 12 times as many leads as those with only 1-5 landing pages.
Naturally, not everyone that views any of your squeeze pages is going to give up their email address, but that doesn’t mean they aren’t still a lead. In the previous point we discussed the Facebook pixel, and a Facebook remarketing campaign, and by adding a Facebook pixel to each of your landing and squeeze pages, you can still treat non-converting visitors as leads. If you have properly implemented the Facebook pixel, you will be able to track which visitors convert, and which don’t, allowing you to display one set of Facebook Ads to those who do convert, and another set to those that close the page without signing up. The one set of Ads will focus on moving a much warmer lead towards converting into a paying customer, while the other set will focus on moving a colder lead towards subscribing, or asking for more information. Someone who follows the CTA in your initial email is still indicating interest, they just didn’t see any value or benefit that immediately appealed to them, but that doesn’t mean they should be ignored.
And of course, customers who do give you their email address and are now receiving messages that are part of your drip campaign also need to be exposed to CTAs, but these CTAs shouldn’t be leading to a squeeze page. These CTAs need to link to your sales page, which will give a lot more detail about your product or service, along with the benefits. Again, you can have any number of sales pages that are specifically designed for each industry and sector that you are targeting. But unlike a squeeze page that aims to get visitors to give you their email address, a sales page is designed to get leads to convert to paying customers.
Sales pages can be much longer than squeeze pages, but again the copy needs to emphasise value and benefit.
9. Optimise Your Pricing Strategy
Whether you’re a new business or an established business, there are always opportunities to optimise your pricing strategy. As with so many aspects of a business, there is no perfect strategy to follow: much of what you choose to charge for your product or service depends on what it is that you are offering, what your target audience is willing to pay, and what your competition is charging.
But there are some best practices you can look into that could help boost your MRR growth, both in terms of new sign ups and reduced churn. Chief among them is the number of pricing plans you present, and how you present them.
The Paradox of Choice is a 2004 book that claimed too much choice creates anxiety, leading to customers walking away rather than trying to decide. While the theory has been criticised, it is somewhat valid in that too much choice makes it difficult to decide, though it can be mitigated by providing sufficient information for each choice. This definitely applies to pricing pages where what works best is a clear indication of how each plan differs.
This isn’t to suggest that having more than five pricing plans is appropriate, but you also shouldn’t feel compelled to limit yourself to only one or two plans. For many businesses, three plans is what works best, but 4-5 plans isn’t uncommon. However, regardless of whether you have one plan or five, you need to clearly present how each plan differs in terms of features and value. Visitors to your pricing page should be able to easily see how the mid-priced tier differs from the entry-level tier, and to then be able to decide which plan is best for their needs.
What you would have noticed on many pricing pages is how one specific plan is highlighted, either as being the most popular choice, or offering the best value – for both customers and you, since it is generally the plan with the highest LTV. Implementing this is quite easy, and comes down to your own design preference. You can either highlight it using a badge
blocking it off
or making it slightly larger, or a different colour to the other plans
What is more important is that each plan clearly states the value proposition: does this plan offer deeper insights, more analytics, more users per plan, etc. All three of the pricing plans shown above do this, with only Salesforce not making it easy to compare specific features for each plan. Box clearly lists all features, including features unique to each plan, while Moz includes a link to a comparison page.
Moz takes their pricing page a step further by also clearly showing the value in paying annually rather than monthly. Getting users to pay for a full year in advance is a great way of reducing churn, and the longer customers use your product or service, the more likely they are to see true value, and the less likely they are to cancel when it is time to renew. But you can only get customers to pay for a year upfront if it benefits them in some way, ideally in value in the form of a discount.
From our own experience, we’ve found the best route is to lead with one super hot ‘Buy it Now’ offer, typically a significant discount around an annual paid plan, for a lower rung product offering. This has the advantage giving the user a super low cost entry into your product range, whilst also with the annual package giving you plenty of time to demonstrate value in the product before renewal, and go for a more valuable upgrade.
| Lead with a single price point, significant discount off annual plan, for your lower tier offering. Low price point helps cautious buyers over the line, and provides a longer lockin period to deliver value and generate upgrades to more expensive tiered products and services. |
To counter the ‘Buy it Now’ offer, we put this along side a start a free trial CTA. This gives two great options for the prospect, making it hard not to choose one of them, and both being great options for MRR growth, when we combine with the next three steps…
10. Onboarding Journey
The Foundation of a Successful User Onboarding Journey
After your user signs up, the job of user onboarding is to get them to see the value of your product and convert.
To understand the job of onboarding, we need to understand the stages your user will go through before, during and after the buying process:
There are 5 major phases your customer will go through when signing up and converting to a paid user:
- The Pain: Your customer has a pain that needs to be solved. This can be a lingering pain (a pain they’ve had for a while that they haven’t solved) or a fresh pain (a pain that’s very recent).
- The Hope: They find your product and can see your “Promise”, that YOU can solve the problem they have.
- The Trial: The customer takes the first major action to lead them to solving their problem: signing up for your product.
- The Value Switch: This is the moment they see for the first time the potential your product has to solve their ultimate pain. This doesn’t mean that you’ve solved their problem completely (yet), it’s the moment they see that with continued use of your product you will solve their problem.
- The Conversion: The customer knows that you can solve their problem, and can see that the value of solving that problem is higher than what you are charging. Customer converts
Your onboarding process should have one major objective: to get users to the Value Switch, where they can see the “value potential” of your product.
I call this the Value Switch because if your customer’s mind is like a dark room, the Value Switch is the moment your customer sees for the first time the potential your product has to solve their problem.
Flipping the Value Switch
In order to flip the Value Switch, you need to work backwards. First, identify what your user needs to accomplish in your product to flip their Value Switch. Then work backwards and identify all the steps they need to take to get there.
For instance, if your Value switch is when a user creates their website and gets their first lead, then your onboarding will include all the actions they need to take to get to that point.
For instance:
- Pick a template
- Edit the template
- Publish a form
- Publish the website
- Share the website with potential customers
- Get a form submission
This is your “Path to First Value”, it’s the steps they need to take to get from The Hope to The Value Switch. Eliminate any steps that don’t help your user get closer to this moment. The fewer and simpler the steps, the better.
A great way to do this is using “Built-in Onboarding.” It onboards your customer with a 4-5 step process, helping them accomplish what they need to do flip their Value Switch:
Here’s an example of a Built-in Onboarding:
With Built-in Onboarding, you walk your user by the hand and show them what they need to do to flip the value switch.
Not all users are created equal
Just like each user will have a different level of pain, and will take specific actions in your app, your onboarding should change and adapt based on what they do or don’t do in your app.
The emails and in app messages should be tied to actions (or triggers) in the app, and should be sent only if they do (or don’t) complete that action.
For instance, if by day 4 the user hasn’t picked a template yet, they get an email reminding them to pick a template. If they already picked a template but haven’t connected their form, they email on Day 4 will show them how (and why) they need to connect their form.
Use tools like Segment, Amplitude and Google Tag Manager to track actions inside your app so you can send emails and messages based on your user’s unique actions.
11. Trial Strategy
How to pick the right Trial Model
There are a number of trial options you can choose from when starting out, including:
- Free 7/14/30 day trial (without CC)
- Free trial (with CC) auto renews if they don’t cancel
- Freemium (free for life, with limited features)
- Pay up front with 30 day guarantee (not really a “trial”, but still involves a very low touch sales process
There are benefits and downsides to all of these trials, but there is one rule that applies to them all:
Your trial should allow your users to flip their value switch.
In other words, your user should be able to see the moment of first value during your trial period. If you have your best features hidden in your top tier plans, your user will sign up and they’ll never be able to see how your product will solve the problems.
| Make sure that your trial allows your users to have initial success with your product, but limit that success so they have to convert to continue reaping the benefits. |
Your trial length and what you offer/limit during your trial will all depend on what your Value Switch is.
12. Trial Re-engagement
What if users sign up and never come back?
Many users will sign up, then not convert immediately. That doesn’t mean that their pain went away, most likely they got busy, distracted, or simply couldn’t get to their Value Switch fast enough.
It’s not uncommon for some users to take up to 90 days to make a decision (even if the trial is only 15 days).
If a user signs up, and then takes no action in your app for a certain period of time, it’s best to put them in a Trial Re-Engagement Sequence that continues to remind them about the pain they have, how it will affect their life, and how your product can solve their pain.
In these emails, you can offer to extend their trial if they want to hop back in and try again. This gives them another chance for you to flip their Value Switch.
What do I do with all the users that expired?
Most likely there are users that signed up and never came back that would return if you just reached out again.
The best way to re-engage old expired trial users is to send a simple email:
Hi [NAME].
Are you still interested in getting more leads/keeping track of outsourcers time worked/booking more appointments/getting articles written?
Name
Your expired trial nurturing sequence should never end, unless they unsubscribe or convert. It’s not uncommon for customers to sign up, wait 6 months, and then convert…as long as you continue to nurture them.
13. Nurture Leads And Customers
There are two aspects to nurturing. For leads, the aim of nurturing is to move them from the marketing section of your funnel to the sales section, with them ultimately converting to paying customers. And for existing customers, nurturing is aimed at reducing churn: keeping customers engaged and less likely to cancel their subscription. Lead nurturing emails get 4-10 times the response rate compared to standalone email blasts, and lead to an average increase of 20 percent in sales opportunities.
Much of what has been discussed in the preceding sections of this guide are all linked to nurturing in some way. From your drip campaign, through to remarketing on Facebook, squeeze pages, onboarding, and trial Re-engagement. But again there are some best practices to consider:
- They should be personalised – most – if not all – of your marketing email messages should be personalised, and this is obviously no different with nurturing messages. List segmentation remains important, since this allows for low-level personalisation, with appropriate messages going out according to industry and past behaviour. Further personalisation in the form of the use of recipient names and business name and/or details are also still necessary.
- They should educate – part of your segmentation should account for where in the buying journey each lead is: awareness, consideration, or decision. This will help you adjust each email accordingly, so that it supports the lead where they are, while encouraging them to move to the next stage. Don’t be shy of including special offers – with a time limit to stimulate a sense of urgency, or to ask for specific feedback.
- They shouldn’t be too frequent – nurturing is about keeping your business top-of-mind for both leads and existing customers, and moving leads along the sales funnel. Sending a nurturing email every day will not accomplish this, it will only serve to annoy them. Once a week, and sometimes only every two weeks should be sufficient, but keep an eye on your metrics to find what the best schedule for your audience is.
- They should change – once a lead moves from the consideration stage to the decision stage, they should be switched to the appropriate nurturing campaign immediately. Sending the wrong nurturing message looks sloppy and can turn customers off. Similarly, as soon as an existing customer cancels their subscription, they should be moved to a nurturing campaign that aims to bring them back.
